Have you ever needed a last minute project? I don't typically sew on the fly, but this time I just had to make an exception. My kids were getting ready to go "trunk or treating" with their cousin. My son said to me, "Mom, I really wish you would make me a super hero mask." I sent my 16yo to JoAnn's to get some felt (it's super nice to have an extra driver in the family now). By the time she was home with the supplies, I had the pattern printed and cut out.
The rest of the project was a simple matter of cutting out the felt and sewing the mask together. It was really, really easy to sew. And he had a mask in less than 15 minutes. As payment for making the mask for him, he agreed to be photographed. And I think he even had fun doing that!
The mask attached with a piece of elastic. There is an option in the pattern to make masks out of cardboard. I think this would be a great idea for a kid's craft project at a party. In fact I even tried to talk my son into that idea, but he really wanted a sewn mask. I love quick and easy sews that make boys happy! (This post uses affiliate links. When you use my affiliate links, I earn a small commission at no extra cost to you. Thanks!) You can purchase this pattern at UpCraft Club. If you make a super hero mask, I'd love to see it!
With the change to cooler weather, I decided it was time for a new bag for me. I have been contemplating making this one for some time now and I finally went ahead and made it. I have sewn several purse/bag patterns by Sew Sweetness. I love the structure and sturdiness that these bags have. I also appreciate the simple construction and easy to follow patterns. This pattern was no exception. I was even able to modify the pattern to have a special feature.
I adore the fabric that I used. It was on the clearance rack at Hobby Lobby so I picked it up not knowing what I would use it for. I think it's perfect for this bag. I also like the two front pockets located just under the flap. They are perfect for keeping items that you want easy access to.
I modified one of the pockets so that I could carry my essential oils with me. I like to take along my oils, but I don't like it when they are just thrown in my bag and then end up getting lost amidst all my other belongings. This modification keeps my oils close at hand and easy to find. It was really simple to modify. Once the pocket was sewn and before attaching it to the purse, I used knit elastic to create little holders for each of my oils. It has space to hold six 10ml roller bottles. I included a couple larger elastic holder slots to keep my hand sanitizer bottle and perhaps a larger bottle of oil. I like that it didn't add any bulk to that pocket and they are still secure within the front flap.
Another modification that I made is that I placed the zipper pocket on the outside of the back of the bag. I did this so I could have an easy to access place for my iPhone. It's perfect because it's secure and I don't have to dig through my bag or hold the flap open awkwardly while out and about. Next time I make this pattern, I will make that zipper pocket opening wider. Also I learned that attaching this kind of pocket doesn't work well with foam as an interfacing. Next time I'll interface the lining so the zipper pocket will install much easier.
Since the zipper pocket went on the outside, I added a simple patch pocket to the inside of the main compartment. I didn't want to go crazy with pockets but felt like maybe the main compartment would be too large and roomy and that I might want a smaller pocket for necessities that often get lost in the bottom of the bag.
The final adjustment that I made is that I extended the strap. I am a huge fan of cross body bags. Cross body bags also happen to work well for my body type, so naturally I would want to wear this one that way. The original length of the strap didn't allow the bag to hand at the desired height. I needed to extend the strap by about 15 inches to get the desired length so it would sit at my hip instead of my waist.
Are you inspired to make your own Appaloosa Bag?
(This post uses affiliate links. When you use my affiliate links, I earn a small commission at no extra cost to you. Thanks!)
You can find the Appaloosa Bag pattern at UpCraft Club.
Several months ago I was asked to help proof read the English translation of this book. I was also asked to test sew one of the projects in the book and give my feedback. Of course I was excited to oblige, and in return I received both a PDF and print copy of the book as a small thank you for my time. I sewed and proof read my project and promptly forgot about ever receiving the book until one day we received a package from Germany.
When I received the package all the way from Germany, I was like, wait I haven't ordered anything international in quite some time. As confused as I was, I went ahead and peeked inside. Yep! A beautiful book was shining up at me. Of course I immediately paged through all the projects and lo and behold at the end of the book my name AND my blog got a mention! Plus they included a picture of my project.
I test sewed project 16 from the book--Small fortune. It is a small (and adorably easy to sew) purse. It has a velcro pocket on the inside and a button closure on the outside. An easy to attach strap also serves as a cute little decoration on the each one of the sides.
In total there are 25 projects in the book. Pattern sheets are included for projects that need them. Some projects include measurement charts for cutting out simple rectangle pattern shapes. All of the instructions are very thorough and include detailed illustrations. This is definitely a beautiful book that will definitely get much more use in my sewing studio.
This post might contain TMI for some of my readers...feel free to skip it if it's too close for comfort for you! (I am sparing you from modeled shots though! NO ONE needs to see THAT much of me!)
I'm super excited that I recently learned how to sew my own bras! I was in the test group for the Greenstyle Creations Endurance Bra. I was a bit skeptical at first for a couple of reasons: one being that I have not really had too much success in sewing anything for myselft, and a second being that it's a bra. I mean I had never sewn a bra before. I did however learn a lot through the process. Keep in mind that this is a sports bra with a front zipper (which I totally love). It is comfortable and as far as fabric choices go--the sky is the limit!
Here I'm posting 3 tips that I learned, and I'm sharing to hopefully encourage you to sew your own bras too!(This post contains affiliate links. When you use my affiliate links, I earn a small commission at no extra cost to you. Thank you for supporting my efforts!)
1. Use Klasse' Stretch Needles OK. This first tip is actually one that I learned long ago when sewing anything stretchy. Forget ball point needles. Just use needles that are marked "stretch". Specifically, I use Klasse' Stretch Needles. Since first using these needles, I know that I will never use another. For these bras I used size 75/11 needle.
2. Buy a whole yard of cut and sew foam (and order 1 inch FOE online too). The pattern calls for a piece of cut and sew foam that is basically a fat quarter. You will be able to get 2 bras out of this amount. But after sewing my muslin and getting a good fit, I wanted to sew several more bras. Purchasing a whole yard of cut and sew foam saved me waste and also saved me from needing to buy more and pay more shipping. This foam is not readily available in local shops, so you will need to order it online. I ordered from Arte Crafts. When I did the math, it was less expensive to buy a whole yard than to buy 4 fat quarters. That was a no-brainer at that point. Oh and I got free shipping because my order was over a certain amount. Sewing the foam is so much fun and it is easily my favorite part of the bra sewing process. Second place is attaching the FOE. By the second bra, I had realized how much I needed to stretch the FOE in order to get enough support and fit from the elastic, so all of my bras fit really really well. The foam adds support in the bra so you definitely need it. It's also soft and comfy, so no worries about rubbing or itching.
My local sewing supply store only sells 1 inch FOE in basic black and white. While that is ok for some bras, I wanted a nice chocolate brown, so I ordered online from Diaper Sewing Supplies. I must say I am impressed with their color selection of 1 inch FOE--they even have prints. You need at least 3 yards per bra using the Greenstyle Endurance Bra pattern, so again order plenty so you can make more than just one or two bras. 3. Once you have a good fit, cut out several bras at one time, then sew them production line style. Trust me when I say that you will want to sew more than 2 bras! The first bra is definitely a muslin. While it might be wearable, it might be your perfect fit. You will definitely know what adjustments need to be made after making a muslin in order for the second bra to be a perfect fit. For my first muslin I used this orange flower print. it is actually swim lycra. For the lining I used solid white swimwear lining, although you can use the outer fabric as the lining as well.
My second bra fit exactly the way I wanted it to fit. I had to go down one cup size, after making the muslin, for the perfect fit. Once I had that perfect fit, it just made sense to cut out several bras and then sew them all production line style. Much, much faster that way! Also once you have made one bra, the sewing really goes much faster. I found that I didn't even need the instructions for the future bras that I sewed.
There are three back options in the Greenstyle Endurance Bra pattern. You can make a traditional sports bra with racer back, criss-cross straps, and there is even an option for adjustable back bra straps. This bra pattern could easily become an everyday bra with that last option. I still need to cut out and sew at least 2 more bras. I'm so excited to be able to sew my own bras! Bras are expensive to purchase and I've only ever been able to own one or two new bras at a time. This pattern has definitely opened up possibilities to me!
This pattern also allows you to customize the bottom band. For this bra I added 2 inches to the bottom of the band and used 1.5" elastic instead of 1" elastic. I love the support that this added to the bra. This pattern calls for knit elastic. I always just thought that elastic was elastic. Not true! Knit elastic retains its shape when stretched. I am now a huge fan of knit elastic for certain applications.
Before sewing these bras, I had already watched a Craftsy class about bra making. The class is for a more traditional bra with underwires and a back closure. You can totally sew Greenstyle Endurance Bra without the Craftsy class, but I did find the information helpful as far as measuring and terminology. There is even an entire lesson in one of the bra making classes on sewing with cut and sew bra foam.
Hello! And welcome to a new DIY Crush link up party! I'm so excited to be hosting this week's link up on my blog. I'm glad you have visited me here in my corner of the blogosphere. While your here, check out my tutorials and freebies page for some great ideas and inspiration. And don't forget to check out my very first sewing pattern that I released earlier this year. (It's on sale for half off right now until August 31, 2016. Use code BACK2SCHOOL2016 in my Etsy shop.) Thanks for visiting!
And if you haven't signed up for my email newsletter, now is the time to do that!
Here are the favorites chosen from last week's party. I hope you had a chance to see them. If not, see last week HERE.
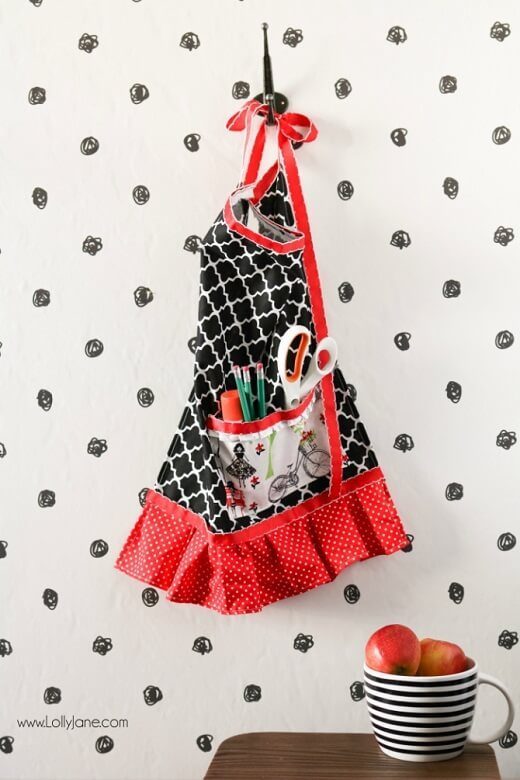
Domenica picked thisEasy Half Apron TutorialfromLolly Jane,a blog full of amazing DIY and decoration ideas! I love the fabric chosen and that pocket would be so perfect for holding a few things that you need to keep close during a project.
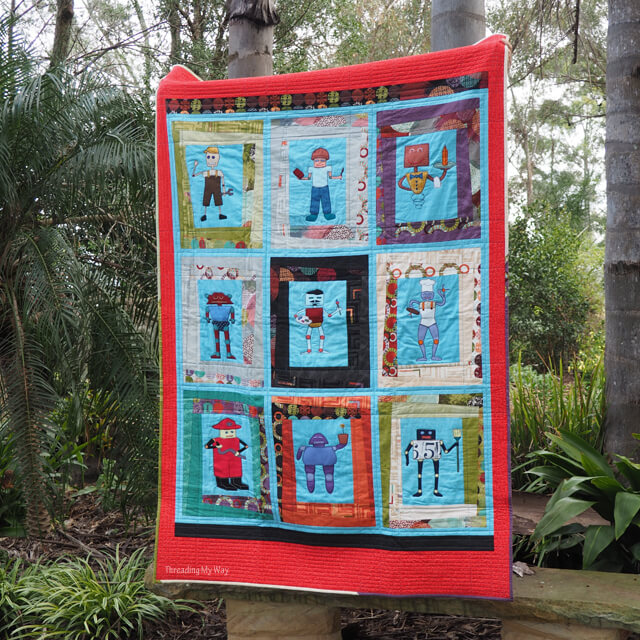
Marsha picked this amazing Robo Quilt by Threading My Way. All of the drawing of the robots are from her son. She is also providing templates for download so you too can make a stunning quilt for a special little (or big) boy for Christmas!
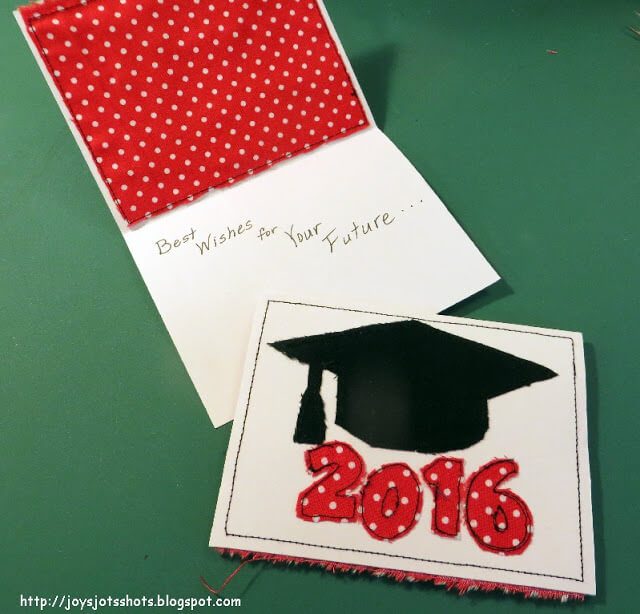
My favorite post from last week is this Paper Guided Stitched Graduation Card from Joy's Jots, Shots & Whatnots. This is a great project to use up scrap fabrics as well! I'm sure the card maker in my family would love to use this idea in the future. I just have to be willing to give her a bit of sewing time on my own sewing machine!
We will pin every instructional post but won't be able to comment on every post. However, if you are one of our favorites, we will comment to let you know!
♥ ♥ ♥ ♥ ♥ ♥
To give you extra exposure, we pin every instructional post you are linking up to this board! Come and follow us on Pinterest!
Please play by our rules :)
Kindly install this image into your site & link to www.diy-crush.com:
(or you can just link to DIY Crush with a text link)
>> To make sure you are playing by my new "rule" I'll check your site before we pin <<
We would love for you to spread the word about this party!! We want everyone to join!
Ready to party now?? We sure are! Let's see what you have been up to lately! It's time to show off!
What Can You Show Off?
free craft tutorials & patterns
pattern reviews (can include links to the pattern for purchase)
decoration with small list of how you did it
recipes for foods that are also kids friendly (no alcoholic recipes please)
business/blogging tips
money tips for SAHM’s and WAHM’s
What CAN’T You Show Off?
shops
giveaways
spam sites
products for sale
adult content
///By linking up you are giving us permission to visit your blog, pin/share images from linked up post and link back to you///
I'm back today with my favorite dress pattern to sew for summer. And modeling it is my adorable niece. Her measurements were just under the recommended measurements for the Soleil Dress pattern for size 12 months, but since that was the smallest size available in the pattern, I went ahead and made it for her. So she has a little bit of room to grow into it, and maybe it will fit her next summer as a little tunic.
(This post contains affiliate links. When you use my affiliate links, I get a small commission. Thanks for supporting my efforts!) My very favorite detail in this dress is the back opening. I love that little surprise. An option for a closed back is also included in the pattern if you wish for that instead.
My second favorite detail in this dress is the pockets. They are so adorable in size 12 months, but you can see in my previous post that they are just as fun in the larger sizes.
This dress calls for knit fabric and ribbing for the bindings. You could also substitute fold over elastic (FOE) if you prefer that look. I like working with FOE but it is a bit tricky to really get the hang of it. The best tip I can give is to stretch the FOE slightly while applying and be sure not to stretch the fabric at all. But truthfully it just takes practice. My first few attempts at FOE ended up in the trash can. #truestory
I also really love how the gathers in the front of the dress are all bunched together at the center. This helps the pockets to be shaped well. In fact this pattern is the first one that I have ever made and bound pockets in this way, so it took me a minute to wrap my mind around the construction. If you have never sewn with knit, this would be a great dress to try it out on--especially if you choose the solid back option. Normally I like to sew knits with my serger, but lately I've been finding that I really love my standard sewing machine for knits by using the knit stitch. If you don't have a special knit stitch, just use a short zig zag stitch.
I love patterns by Lauren at Baste and Gather. You can purchase all of her patterns at (affiliate link) UpCraft Club. If you are a member, you can even purchase them with your monthly credit too.
I was so excited to sew this adorable little dress. From the moment that I was inspired to make it, I knew it was going to be adorable. I just might have to name this dress the most favorite thing I have ever sewn! I love it when a plan comes together so perfectly.
(This post contains affiliate links. When you make a purchase through my affiliate links, I earn a small commission at no extra cost to you. Thank you for supporting my creative efforts!)
I started with the Norah Dress and Tunic by Mouse House Creations. I was going to make a tunic, but then I settled on the dress. You can purchase this pattern at the (aff. link) UpCraft Club. Are you a member yet?
Here's an easy way to get wide striped fabric if you can't find it easily:
Cut fabric strips that are all the same width. For this dress, I used strips that were each 2 & 1/2 inches wide. But if you are making a dress for an older girl, you may want wider stripes.
Sew all the strips together keeping your seams nice and even. I used 1/4 inch seam allowances, which made my finished stripes each 2 inches wide.
Top stitch your fabric if desired--I left off the top stitching for this dress.
Use the striped fabric that you made to cut out your pattern. You will want to line up your fabric carefully to get the stripes to match perfectly on the back and side seams.
I also opted for a full lining instead of a partial one. I actually prefer a full lining on a dress like this, especially with the white fabric. To do this simply cut the lining from the full dress pattern instead of the lining mark. Also cut the lining a couple inches shorter than the finished length of the dress so it doesn't show at the bottom of the dress. Assemble the dress and lining following the regular instructions in the pattern, except substitute the full lining in place of the partial facings.
I wasn't too sure about the collar on this one, but that navy just contrasts so nicely with the red and white. And the chunky button on the back just adds the right amount of pop to the dress.
I adore the a-line shape of this dress and all of the details just make it perfection! Do you have any plans for any patriotic sewing this summer?





 Monday, June 27
